New Approaches in Swift for Testing: Analysis of Swift Testing Technology
For years, testing in Swift has been a mix of XCTest, third-party libraries, and custom solutions. That all changed at WWDC 24 with the introduction of Swift Testing, a modern framework from Apple that completely rethinks the testing process.
In this article, we'll explore the powerful new capabilities of Swift Testing and how it improves upon its predecessor.
An Introduction to Swift Testing
Swift Testing is a new unit testing framework from Apple, unveiled at WWDC 24 as a modern replacement for the classic XCTest. It's open-source and designed from the ground up to leverage the latest features of the Swift language.
The framework supports modern Swift features like macros and Swift Concurrency. It's also cross-platform, running everywhere Swift does (macOS, iOS, Linux, Windows), which is a game-changer for server-side development and building universal tools.
However, the framework currently has some limitations. It doesn't yet support UI tests, performance testing, or Objective-C code. Despite this, Swift Testing is already a compelling alternative to XCTest thanks to its powerful new features.
Key Features of Swift Testing
The @Test Macro
Swift Testing introduces the @Test macro, which simplifies test creation. You no longer need to create a class that inherits from XCTestCase; simply annotate any function with @Test to turn it into a test.
import Testing

@Test
func foodTruckExists() {
    // Test logic goes here.
}
You can also provide a custom display name for better readability and add modifiers like @MainActor or async throws directly to the test function.
@Test(Food truck exists)
@MainActor
func foodTruckExists() async throws {
    // Test logic goes here.
}
Simplified Test Lifecycle
Unlike XCTest, where tests are tied to classes, Swift Testing allows you to use both classes and structures. This simplifies the test lifecycle: instead of overriding setUp and tearDown methods, you can now use standard initializers (init) and deinitializers (deinit) for setup and cleanup logic.
Grouping Tests with @Suite
Alongside @Test, the framework includes the @Suite macro to group related tests into a collection. Using suites, you can:
- Group related tests into a single logical unit.
- Nest suites to create a clear test hierarchy.
- Apply modifiers (Traits) to all tests within a suite at once.
- Customize the display name in Xcode and test reports.
@Suite(Arithmetic)
struct ArithmeticTests {
    let calc = Calculator()

    @Test
    func addition() {
        let result = calc.addition(num1: 2, num2: 3)
        #expect(result == 5)
    }

    @Test
    func subtraction() {
        let result = calc.subtraction(num1: 5, num2: 3)
        #expect(result == 2)
    }
}
Modern Assertions with #expect and #require
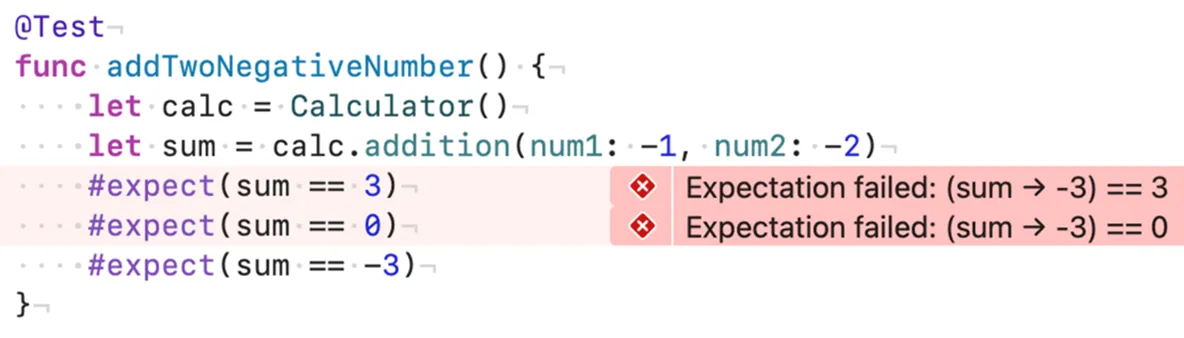
Swift Testing replaces traditional XCTAssert functions with a flexible macro-based approach. The primary tool is the #expect() macro, which checks if a condition is true.
A key advantage of #expect() is that it records a failure but allows the test to continue running. This enables you to see all failing assertions in a single test run instead of stopping at the first one.
For situations where a failure should immediately stop the test, you can use the #require() macro. If its condition is false, the test terminates by throwing an error. Additionally, #require() can be used to unwrap optionals, serving as a modern replacement for XCTUnwrap from XCTest.
@Test
func stringParsesToInt() throws {
    let data = 2
    let parsed = try #require(Int(data))
    #expect(parsed == 2)
}
Customizing Tests with Traits
Traits are modifiers that add metadata or change the behavior of tests and suites. You can use them to conditionally enable or disable tests, add descriptive tags, set time limits, and much more.
Conditional Execution and Disabling
You can easily disable a test or an entire suite using the .disabled() trait, with an optional reason for documentation. You can also use the .enabled(if:) trait to run tests only when a specific condition is met. These can be combined for more complex logic.
@Test(Food truck sells burritos, .disabled(We only sell Thai cuisine))
func sellsBurritos() async throws {
// ...
}

enum Season { case winter, spring, summer, autumn
  static var current: Season = .summer
}

@Test(Ice cream is cold, .enabled(if: Season.current == .summer))
func isCold() async throws {
    // ...
}
Tagging Tests for Organization
Swift Testing introduces a powerful tagging system. You can define custom tags and apply them to tests and suites for better organization, making it easy to filter and run specific groups of tests.
// 1. Define custom tags
extension Tag {
    @Tag static var networking: Tag
    @Tag static var json: Tag
}

// 2. Apply tags to tests and suites
@Suite(.tags(.networking))
struct NetworkLayerTests {
    @Test(Decode User from JSON, .tags(.json))
    func decodeUser() {
        // ...
    }
}
Linking to Bug Reports
You can link a disabled test directly to an issue in a bug tracking system. The .bug() trait lets you add a URL, and Xcode provides a button to open the link directly from the test report.
@Test(.disabled(), .bug(https://my-jira-instance.com/browse/PROJ-123))
func testFailingFeature() throws { ... }
Parameterized Tests
One of the most significant new features is support for parameterized tests. This allows you to run the same test logic multiple times with different input values, which is ideal for verifying functionality across a range of cases without writing repetitive code.
Instead of using a for loop inside a test, you can pass a collection of inputs directly as an argument to the @Test macro. The test function then receives each value as a parameter, and Swift Testing runs the test once for each item.
enum Food: CaseIterable {
    case burger, iceCream, burrito, noodleBowl, kebab
}

@Test(All foods available, arguments: Food.allCases)
func foodAvailable(_ food: Food) async throws {
    let foodTruck = FoodTruck(selling: food)
    #expect(await foodTruck.cook(food))
}
Parameterization also works with multiple arguments. To test corresponding pairs of values from multiple collections, use the zip() function to combine them into a single sequence of tuples. Otherwise, the framework will test every possible combination.
@Test(arguments: zip([18, 30, 50, 70], [77.0, 73, 65, 61]))
func verifyNormalHeartRate(age: Int, bpm: Double) {
    let hr = HeartRate(bpm: bpm)
    let context = HeartRateContext(age: age, activity: .regular, heartRate: hr)
    #expect(context.zone == .normal)
}
Migrating from XCTest to Swift Testing
Let's look at a few common scenarios to see how you can migrate your existing XCTest code to the new framework.
Example 1: Consolidating Repetitive Tests
If you have multiple tests that differ only by input values, parameterized tests are the perfect solution. You can merge them into a single, cleaner test by passing the varying parameters as arguments.
Before: XCTest
final class OKPerfomanceModuleTests: XCTestCase {
    // ...
    func testBeginChildCallNoMessage() throws {
        let scenario = test-scenario-1
        // ... assertions
    }

    func testBeginChildCallWithMessage() throws {
        let scenario = test-scenario-2
        let message = test-message
        // ... similar assertions
    }
}
After: Swift Testing
struct Argument {
    let scenario: String
    let message: String?
}

final class OKPerfomanceModuleTests {
    @Test(arguments: [
        Argument(scenario: test-scenario-1, message: nil),
        Argument(scenario: test-scenario-2, message: test-message),
    ])
    func beginScenario(arg: Argument) {
        // ... single set of assertions using arg
        #expect(collector.scenario == arg.scenario)
        #expect(collector.message == arg.message)
    }
}
Example 2: Migrating from XCTUnwrap
The XCTUnwrap function can be directly replaced with the more expressive #require() macro, which serves the same purpose of unwrapping an optional or throwing an error.
Before: XCTest
func testResponseSerializerFailsDataIsNil() throws {
    // ...
    let networkError = try XCTUnwrap(result.failure?.asNetworkingError)
    XCTAssertEqual(networkError.isInputDataNilOrZeroLength, true)
}
After: Swift Testing
@Test
func responseSerializerFailsDataIsNil() throws {
    // ...
    let networkError = try #require(result.failure?.asNetworkingError)
    #expect(networkError.isInputDataNilOrZeroLength)
}
Swift Testing is a modern, intuitive framework that significantly simplifies the work of developers and testers. With powerful features like Swift Concurrency support, parameterized tests, and extensive customization through traits, it marks a major step forward for the Swift ecosystem.
While still new, it's a promising replacement for XCTest that is well worth exploring for your next project.